1.5.1 画用户自定义图形
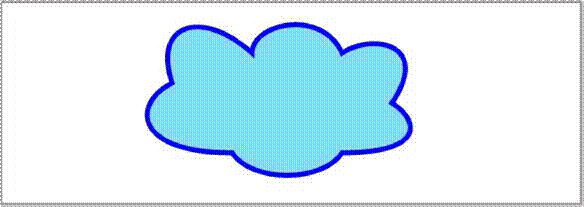
要画一个用户自定义的图形,需要创建一个路径,然后用 closePath() 方法关闭此路径即可。
我们可以使用lineTo(), arcTo(), quadraticCurveTo() 或 bezierCurveTo() 来创建每个子路径,然后用这些子路径组成想要的图形。如:
<script>
context.closePath();
</script>
效果图

代码
<!DOCTYPE HTML>
<html>
<head>
<style> body { margin: 0px; padding: 0px;
}
#myCanvas {
border: 1px solid #9C9898;
}
</style> <script>
window.onload = function() {
var canvas = document.getElementById("myCanvas"); var context = canvas.getContext("2d");
// 开始用户图形的绘制
context.beginPath(); context.moveTo(170, 80);
context.bezierCurveTo(130, 100, 130, 150, 230, 150); context.bezierCurveTo(250, 180, 320, 180, 340, 150); context.bezierCurveTo(420, 150, 420, 120, 390, 100); context.bezierCurveTo(430, 40, 370, 30, 340, 50); context.bezierCurveTo(320, 5, 250, 20, 250, 50); context.bezierCurveTo(200, 5, 150, 20, 170, 80);
// 完成用户图形的绘制
context.closePath(); context.lineWidth = 5; context.strokeStyle = "blue";
context.stroke(); };
</script>
</head>
<body>
<canvas id="myCanvas" width="578" height="200"></canvas>
</body>
</html>
1.5.2 图形的颜色填充
要填充图形,需要用 fillStyle 属性设置填充图形用的颜色,然后使用 fill() 方法完成对图形
的填充。默认情况下, fillStyle 的颜色是黑色。如:
<script>
context.fillStyle = "blue";
context.fill(); </script>
注意: fill 方法要在 strok 方法之前执行,否则 fill 会覆盖掉 stroke 的一半区域。
效果图
代码
<!DOCTYPE HTML>
<html>
<head>
<style> body { margin: 0px; padding: 0px;
}
#myCanvas {
border: 1px solid #9C9898;
}
</style> <script>
window.onload = function() {
var canvas = document.getElementById("myCanvas"); var context = canvas.getContext("2d");
// 开始用户图形的绘制
context.beginPath(); context.moveTo(170, 80);
context.bezierCurveTo(130, 100, 130, 150, 230, 150); context.bezierCurveTo(250, 180, 320, 180, 340, 150); context.bezierCurveTo(420, 150, 420, 120, 390, 100); context.bezierCurveTo(430, 40, 370, 30, 340, 50); context.bezierCurveTo(320, 5, 250, 20, 250, 50); context.bezierCurveTo(200, 5, 150, 20, 170, 80);
// 完成用户图形的绘制
context.closePath(); context.lineWidth = 5; context.fillStyle = "#8ED6FF"; context.fill();
context.strokeStyle = "blue"; context.stroke();
};
</script>
</head>
<body>
<canvas id="myCanvas" width="578" height="200"></canvas>
</body>
</html>
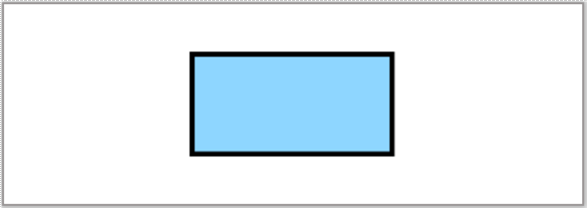
1.5.3 矩形
绘制矩形使用 rect() 方法。每个矩形需要由左上角坐标 (x, y) 和矩形的宽与高 (width,
height)来确定。
如:
<script>
context.rect(x, y, width, height); </script>
效果图
代码
<!DOCTYPE HTML>
<html>
<head>
<style>
#myCanvas {
border: 1px solid #9C9898;
} body { margin: 0px; padding: 0px;
}
</style> <script>
window.onload = function() {
var canvas = document.getElementById('myCanvas'); var context = canvas.getContext('2d');
context.beginPath(); context.rect(188, 50, 200, 100); context.fillStyle = '#8ED6FF'; context.fill(); context.lineWidth = 5; context.strokeStyle = 'black';
context.stroke(); };
</script>
</head>
<body>
<canvas id="myCanvas" width="578" height="200"></canvas>
</body>
</html>
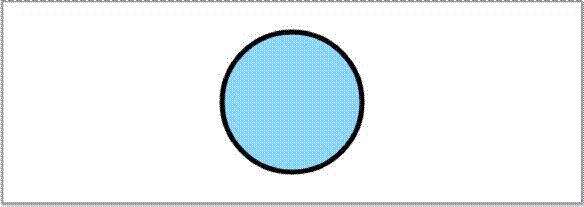
1.5.4 圆画圆只需要在调用 arc() 方法时,将起始角度设为0,终止角度设为 2 * PI 即可。如:
<script>
context.arc(x, y, radius, 0 , 2 * Math.PI, false); </script>
效果图
代码
<!DOCTYPE HTML>
<html>
<head>
<style> body { margin: 0px; padding: 0px;
}
#myCanvas {
border: 1px solid #9C9898;
}
</style> <script>
window.onload = function() {
var canvas = document.getElementById("myCanvas");
var context = canvas.getContext("2d"); var centerX = canvas.width / 2; var centerY = canvas.height / 2; varradius = 70;
context.beginPath();
context.arc(centerX, centerY, radius, 0, 2 * Math.PI, false); context.fillStyle = "#8ED6FF";
context.fill(); context.lineWidth = 5; context.strokeStyle = "black"; context.stroke();
};
</script>
</head>
<body>
<canvas id="myCanvas" width="578" height="200"></canvas>
</body>
</html>
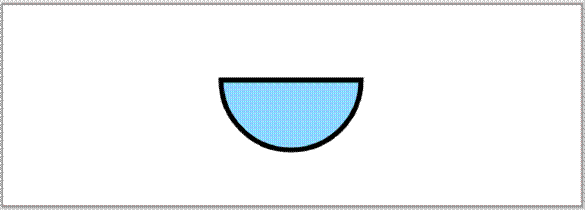
1.5.5 半圆画半圆也是用 arc() 方法,只需要将终止角度设为起始角度 + PI 即可。如:
<script>
context.arc(x, y, radius, startAngle, startAngle + Math.PI, antiClockwise); </script>
效果图
代码
<!DOCTYPE HTML>
<html>
<head>
<style> body { margin: 0px; padding: 0px;
}
#myCanvas {
border: 1px solid #9C9898;
}
</style> <script>
window.onload = function() {
var canvas = document.getElementById("myCanvas"); var context = canvas.getContext("2d");
context.beginPath();
context.arc(288, 75, 70, 0, Math.PI, false);
context.closePath(); context.lineWidth = 5; context.fillStyle = "#8ED6FF"; context.fill();
context.strokeStyle = "black"; context.stroke(); };
</script>
</head>
<body>
<canvas id="myCanvas" width="578" height="200"></canvas>
</body>
</html>